Storage Locations
Configuration > Inventory > Storage Locations
This page is used to create Storage Locations that can be assigned to buildings for use in documenting inventory.
Sub-locations can be used to further categorize inventory storage locations. Sub-location can be indicated in item adjustments, item receipts, physical counts, and production records. Sub-locations are reported on the following reports: Receiving Ticket, Physical Count Worksheet, Pick List, and Inventory Data Report.
-
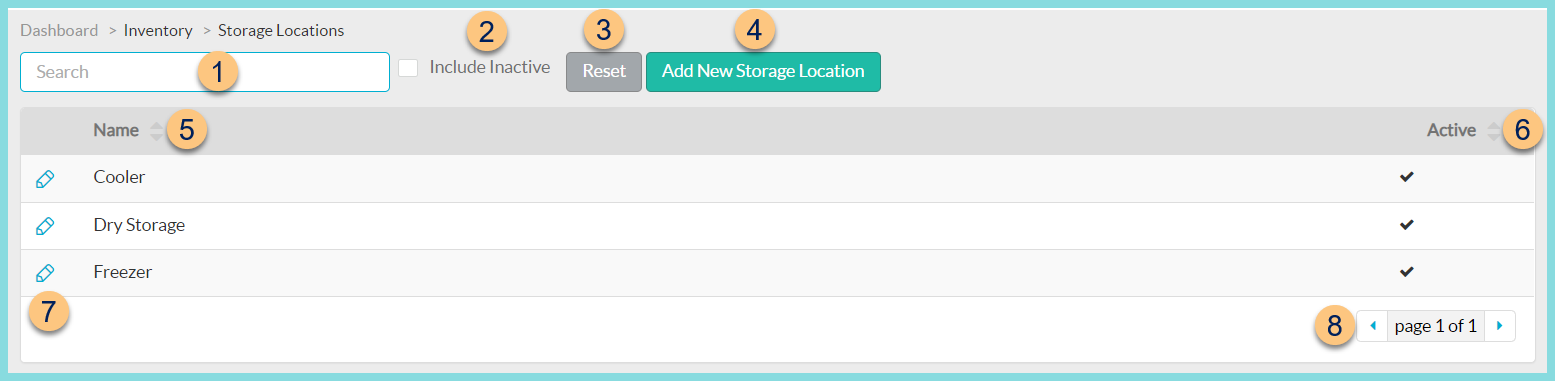
Name - search by name
-
Include Inactive - click to include inactivated storage locations in search results
-
Reset - click to reset search parameters
-
Add New Storage Location - click to add a new location
-
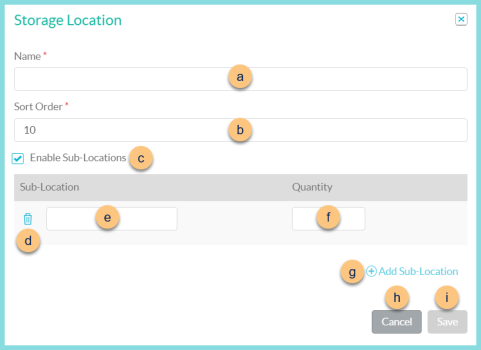
Name - enter the storage location name
-
Sort Order - change sort order if needed
Note: Items c-g are only available if sub-locations are enabled. -
Enable Sub-Locations - check to indicate that this storage location includes sub-locations
-
Trash Can - click to delete sub-location
-
Sub-Location - enter the sub-location name (ex. Bin, Aisle, Shelf, etc.)
-
Quantity - enter the quantity of sub-locations
-
(+) Add Sub-Location - click to add a new nested sub-location
Note: There can be up to 4 levels of nested sub-locations (Ex: 2 sections per bin, 10 bins per shelf, 3 shelves per aisle, 5 aisles)
-
Cancel - click to return to the previous screen without saving changes
-
Save - click to save changes
-
-
Name - click to sort by name
-
Active - click to sort by active status
-
Pencil - click to edit an existing storage location
Note: Storage location Active status and sub-location details cannot be edited if there is inventory within the storage location.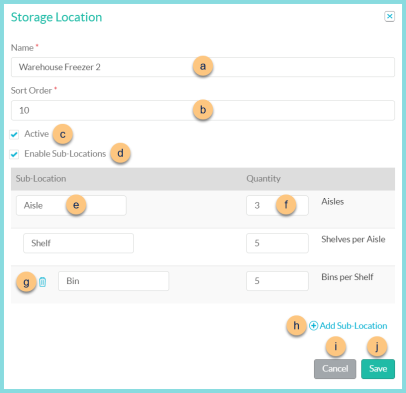
-
Name - enter the storage location name
-
Sort Order - change sort order if needed
-
Active - toggle active status
Note: Items d-h are only available if sub-locations are enabled.
-
Enable Sub-Locations - check to indicate that this storage location includes sub-locations
-
Trash Can - click to delete sub-location
-
Sub-Location - enter the sub-location name (ex. Bin, Aisle, Shelf, etc.)
-
Quantity - enter the quantity of sub-locations
-
(+) Add Sub-Location - click to add a new nested sub-location
-
Cancel - click to return to the previous screen without saving changes
-
Save - click to save changes
-
-
< > - click to scroll through pages
The following locations are created by default and can be edited if needed:
-
Dry Storage
-
Freezer
-
Refrigerator