Daily Menu Plan
Menu Planning > Menu Plans
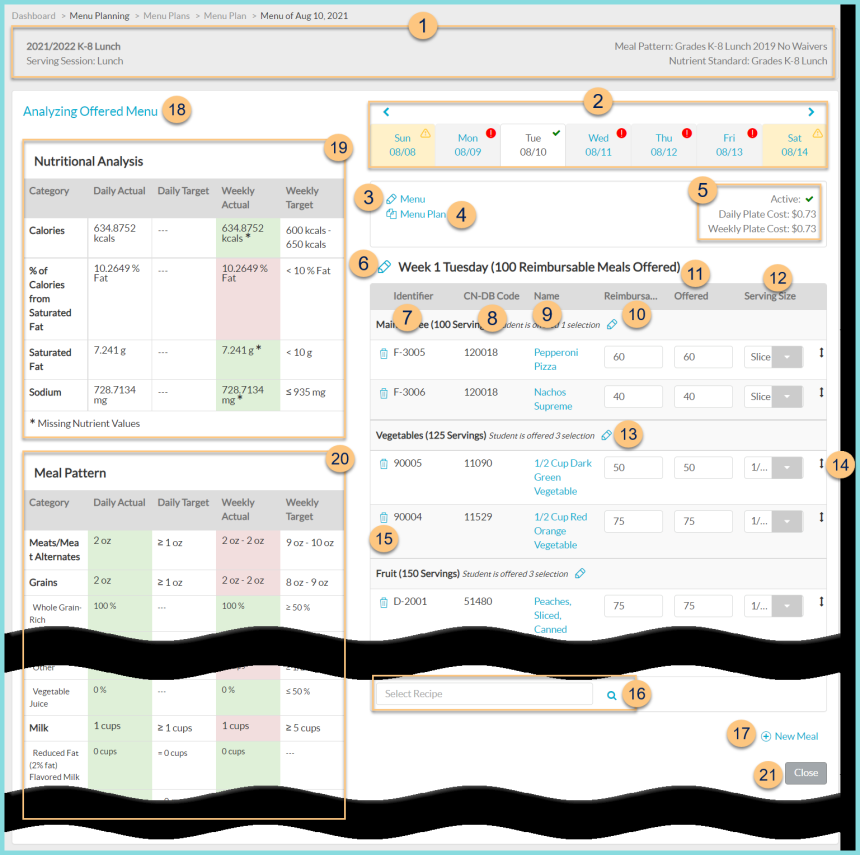
The Menu Plan screen is used to plan and analyze the day's menu.
-
Notice the Menu Plan Name, Serving Session, Meal Pattern, and Nutrient Standard.
-
Click < > to scroll through weeks or click the Day MM/YY to jump to a different day within the same week. Notice the symbols and color code (below). Note: the (!) symbol appears on all active menu days regardless of status or compliance.
Green Check - day meets daily requirements
Yellow Yield Sign - this is a non-academic day and is not included in the analysis.
(!) - day does not meet daily requirements
Gray - inactive menu day
White - menu currently being edited
Yellow - inactive menu day -
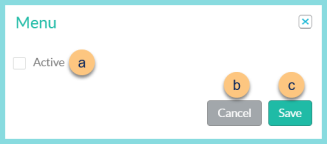
Pencil Menu - click to toggle active status
-
Active - toggle active status
-
Cancel - click to return to the previous screen without saving changes
-
Save - click to save changes
-
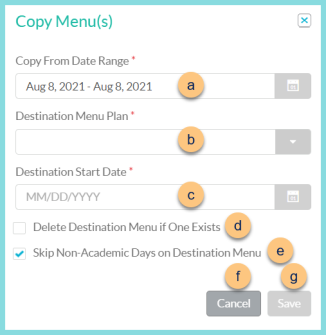
Copy Menu Plan - click to copy an existing menu plan day or dates and paste to a different day or dates.
Academic Calendar Based Menu
-
Copy From Date Range - select the date range to be copied (Default: date from which Copy Menu was clicked)
-
Destination Menu Plan - select the menu plan where the copied date range is to be pasted
-
Destination Start Date - select the starting date on which to paste the first day of the copied date range
-
Delete Destination Menu if One Exists
Unchecked (default) - copied menu will be pasted in addition to existing menu
Checked - copied menu will replace the existing menu -
Skip Non-Academic Days on Destination Menu
Unchecked - copied menu will be pasted to days as indicated, including non-academic days
Checked (default) - copied menu will be pushed forward past any non-academic days. Ex: If a 4-day menu is pasted onto a Monday, but the Monday is inactive, the menu will be pasted to Tuesday - Friday. -
Cancel - click to return to the previous screen without copying the menu
-
Save - click to paste the menu based on the selected parameters
-
Copy From Date Range - select the range of days to be copied (Default: day from which copy menu was clicked)
-
Destination Menu Plan - select the menu plan where the copied date range is to be pasted
-
Destination Start Cycle Day (cycle menu destination) - enter the cycle day number on which to paste the first day of the copied date range or Destination Start Date (not pictured, academic calendar menu destination) - select the date on which to paste the first day of the copied date range
-
Delete Destination Menu if One Exists
Unchecked (default) - copied menu will be pasted in addition to existing menu
Checked - copied menu will replace the existing menu -
Skip Non-Academic Days on Destination Menu
Unchecked - copied menu will be pasted to days as indicated, including non-academic days
Checked (default) - copied menu will be pushed forward past any non-academic days. Ex: If a 4-day menu is pasted onto a Monday, but the Monday is inactive, the menu will be pasted to Tuesday - Friday. -
Cancel - click to return to the previous screen without copying the menu
-
Save - click to paste the menu based on the selected parameters
-
Notice the Active status, Daily Plate Cost, and Weekly Plate Cost.
Daily Plate Cost = Sum of (planned or offered of item * item cost / planned or offered reimbursable meals)
Weekly Plate Cost = (Sum of (planned or offered of item * item cost / planned or offered reimbursable meals)) / days of week
Note: Plate cost will be $0.00 if the customer does not use TITAN's inventory module. -
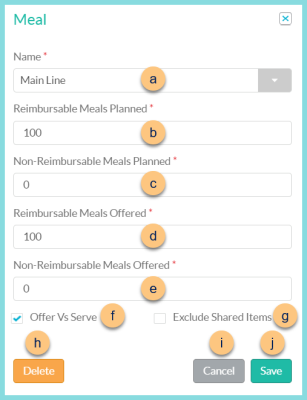
Pencil Meal Name - notice the meal name and number of entered reimbursable offered meals. Click to edit meal settings.
-
Name - select meal
-
Reimbursable Meals Planned - enter reimbursable meals planned. Note: 100 is recommended to represent 100%.
-
Non-Reimbursable Meals Planned - enter non-reimbursable meals planned. Note: 0 is acceptable as non-reimbursable meals are not analyzed.
-
Reimbursable Meals Offered - enter reimbursable meals offered. Note: 100 is recommended to represent 100%.
-
Non-Reimbursable Meals Offered - enter non-reimbursable meals offered. Note: 0 is acceptable as non-reimbursable meals are not analyzed.
-
Offer Vs Serve - check to indicate offer vs. serve (OVS) status for documentation purposes
-
Exclude Shared Items
Checked - items from shared meals will not be included in the analysis of this meal
Unchecked - items from shared meals will be included in the analysis of this meal -
Delete - click to delete the meal from this day
-
Cancel - click to return to the previous screen without saving changes
-
Save - click to save changes
-
Identifier - notice the recipe identifier
-
CN-DB Code - notice the Child Nutrition Database Code if the item is linked
-
Name - notice the recipe name. Click to be redirected to the general tab of the item.
-
Reimbursable Planned - enter the number of planned reimbursable servings
-
Offered - enter the number of offered reimbursable servings. Note: Typically the user will enter the same number as the planned servings. Actual offered servings are entered on the production record.
-
Serving Size - select the serving size
-
Recipe Category (# Servings) - notice the Recipe Category and the sum of planned servings of items in the category. Student is offered X selection Pencil - click to edit the number of selections offered to each student as part of the reimbursable meal. By default, TITAN assumes the student can have one of each item in the category as part of the reimbursable meal. If a quantity is entered, TITAN will analyze as if the student can have that number of items (same or different) from the category for meal pattern purposes.
-
Double Arrow Icon - drag and drop to rearrange items within the recipe category
-
Trash Can - click to remove the item from the menu plan
-
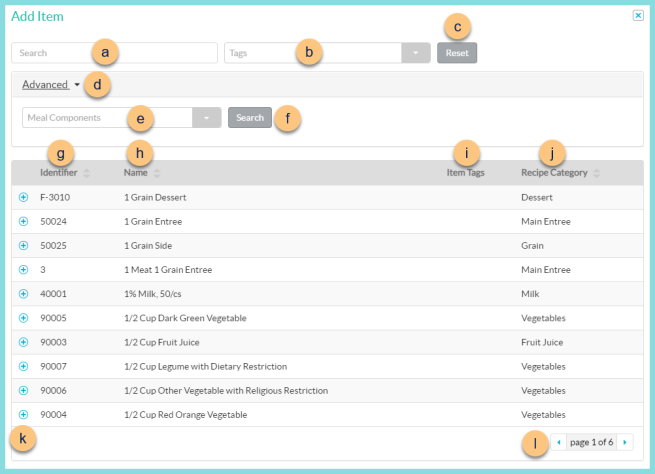
Search Items - search for items or click the Magnifying Glass to add recipes and simple recipes to the menu plan
-
Search - search for recipes and simple recipes
-
Tags - filter by item tags
-
Reset - click to reset filters
-
Advanced - click to open additional filters
-
Meal Components - filter by meal component(s)
-
Search - click to search by advanced filters
-
Identifier - click to sort by identifier
-
Name - click to sort by name
-
Item Tags - notice item tags
-
Recipe Category - click to sort by recipe category
-
(+) - click to add recipe to menu plan
-
< > - click to scroll through pages
-
(+) New Meal - click to add a new meal. See Step 6 for details.
-
Analyzing Offered Menu - click to toggle between analyzing the offered and planned columns (default: offered)
-
Nutritional Analysis - notice the daily and weekly actuals and daily and weekly targets of nutrients. Actuals are color coded to indicate compliance. Red = out of compliance. Green = in compliance. White = no target.
For Calories, % Calories from Fat, Saturated Fat, and Sodium, notice:
Daily Actual (weighted average of daily menu items) = (Sum of (planned or offered) item servings x nutrient value) / (sum of (planned or offered) reimbursable meals)
Daily Target - Daily Nutrient Standard
Weekly Actual (weighted average of weekly menu items) = (Sum of Daily Actual Nutrient) / (# of days of week).
Weekly Target - Weekly Nutrient Standard
Note: Weekly columns will not appear on non-academic days. -
Meal Pattern - notice daily and weekly actuals and daily and weekly targets. Weekly actuals are color coded to indicate compliance. Red = out of compliance. Green = in compliance. Yellow = in compliance with current standards but out of compliance with original standards. Note: Weekly actual for meats/meat alternates and grains will be highlighted in yellow when above the maximum, which is no longer enforced.
For each Meal Component of the selected meal pattern, notice:
Daily Actual = sum of minimum of meal components in each recipe category
Daily Target = Daily Meal Pattern requirements
Weekly Actual = Sum of daily actual of meal component across the week.
Weekly Target = Weekly Meal Pattern requirements
Note: Weekly columns will not appear on non-academic days -
Close - click to return to the menu plans screen (Changes are saved automatically.)
Cycle-Based Menu
