Posting Production Records
Menu Planning > Production Records > (production record) > (day)
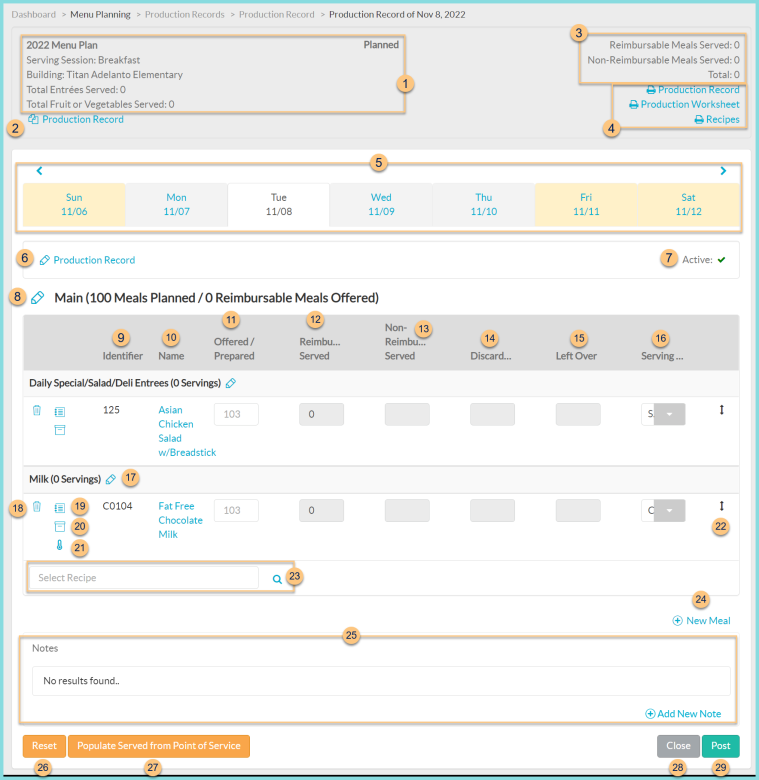
The production record posting screen is used to document the day's production. Production records should be posted by the end of the production day.
-
Notice the Menu Plan Name, Serving Session, Building, Total Entrees Served (sum of reimbursable servings in categories that count as an entree), Total Fruit or Vegetables Served (sum of reimbursable cups of fruit and vegetable meal component * 2, which represents number of 1/2 cup servings), and Production Record Status.
-
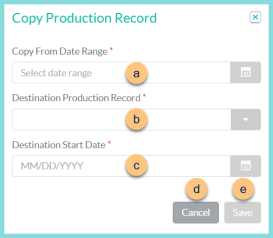
Copy Production Record - click to copy an existing production record day or dates and paste to a different day or dates.
-
Copy From Date Range - select the date range to be copied
-
Destination Production Record - select the production record where the copied date range is to be pasted
-
Destination Start Date - select the starting date on which to paste the first day of the copied date range
-
Cancel - click to return to the previous screen without copying the menu
-
Save - click to paste the menu based on the selected parameters
-
Notice the Reimbursable Meals Served, Non-Reimbursable Meals Served, and Total meals sold at the POS for the same date, building, and serving session.
-
Click Print Production Record to request a copy of the production record report. Click Print Production Worksheet to request a copy of the production worksheet report. Click Print Recipes to request a batch of all recipes for the planned quantity (note: recipes for which printing has been excluded will not print).
-
Click < > to scroll through weeks or click the Day MM/YY to jump to a different day within the same week. Notice the color code (below).
Yellow - inactive menu day
White - menu currently being edited
Gray - active menu day -
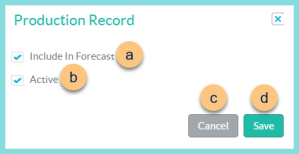
Pencil Production Record - click to edit forecast rights and active status
-
Include In Forecast - toggle to indicate whether this day should be used as part of the 3-day moving average production forecast
-
Active - toggle active status to indicate whether this is an active production day
-
Cancel - click to return to the previous screen without saving changes
-
Save - click to save changes
-
Active - notice active status
-
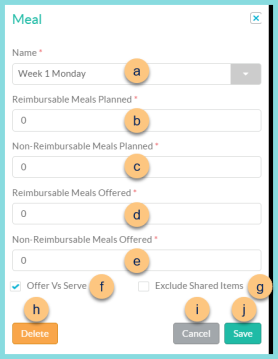
Pencil Meal (x Meals Planned / y Reimbursable Meals Offered) - click to set the planned and offered meals for the day
-
Name - choose a different meal if needed
Note: B and C will be pre-populated based on production forecasting if criteria have been met -
Reimbursable Meals Planned - change reimbursable meals planned if needed
-
Non-Reimbursable Meals Planned - change non-reimbursable meals planned if needed
Note: D and E are typically not entered until after production -
Reimbursable Meals Offered - change reimbursable meals offered if needed
-
Non-Reimbursable Meals Offered - change non-reimbursable meals offered if needed
-
Offer Vs Serve - toggle OVS status (Checked - meal will be documented as offer vs. serve; Unchecked - meal will be documented as serve only)
-
Exclude Shared Items - toggle shared items status (Checked - items from shared meals will not be included in the analysis of this meal; Unchecked - items from shared meals will be included in the analysis of this meal)
-
Delete - click to delete meal
-
Cancel - click to return to the previous screen without saving changes
-
Save - click to save changes
-
Identifier - notice the Recipe Identifier
-
Name- notice the Recipe Name
-
Offered/Prepared - notice the planned quantity in light gray. Enter the quantity prepared for each item.
-
Reimbursable Served = Prepared - Non-Reimbursable Served - Discarded - Left Over
-
Non-Reimbursable Served - enter the quantity of non-reimbursable servings of the item (adults, seconds, a la carte)
-
Discarded - enter the number of discarded servings
-
Left Over - enter the number of servings saved as leftovers to serve again another time
-
Serving Size - notice the serving size for each item and change if needed
-
Recipe Category (sum of offered servings) Student is offered X selections Pencil - click to edit number of selections offered to each student as part of the reimbursable meal.
-
Trash Can - click to remove the item from the production record
-
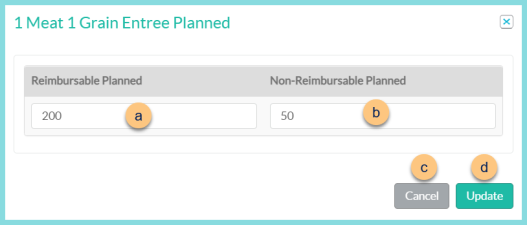
Notebook icon - hover to view planned quantities. Click to change planned quantities.
-
Reimbursable Planned - edit the reimbursable planned quantity
-
Non-Reimbursable Planned - edit the non-reimbursable planned quantity
-
Cancel - click to return to the previous screen without saving changes
-
Update - click to update the planned quantities
-
Case icon - hover to see on hand, to receive, and total base unit of measure quantities
-
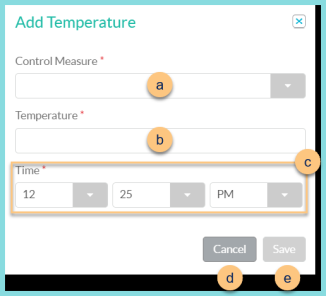
Thermometer icon - click to add temperatures manually.
-
Control Measure - select control measure
-
Temperature - enter the temperature recorded
-
Time - select the time of the temperature (default, time the thermometer button was clicked)
-
Cancel - click to return to the previous screen without saving changes
-
Save - click to save changes
Repeat 19a-19e as need to record each temperature taken. -
Double Arrow - click and drag to change the order of recipes within the recipe category
-
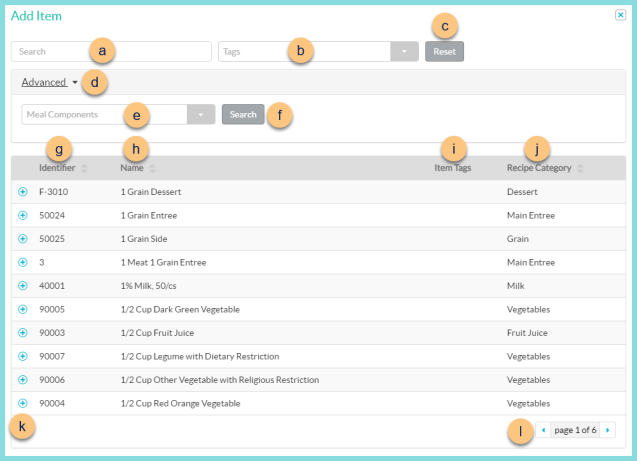
Select Recipe - search for items or click the Magnifying Glass to add recipes and simple recipes to the production record
-
Search - search for recipes and simple recipes
-
Tags - filter by item tags
-
Reset - click to reset filters
-
Advanced - click to open additional filters
-
Meal Components - filter by meal component(s)
-
Search - click to search by advanced filters
-
Identifier - click to sort by identifier
-
Name - click to sort by name
-
Item Tags - notice item tags
-
Recipe Category - click to sort by recipe category
-
(+) - click to add recipe to production record
-
< > - click to scroll through pages
-
(+) New Meal - click to add a new meal. See step 6 for details.
Personnel and Water Offering (not pictured, North Carolina only) - check options to indicate compliance with NC requirements (Healthy Employees, Clean Employee Appearance, Proper Hand Washing, No Bare Hand Contact for RTE Food, Thermometers Checked and Calibrated If Needed, Water Available). Enter Corrective Action taken if needed (note: Corrective Action is disabled if all options are checked as completed). -
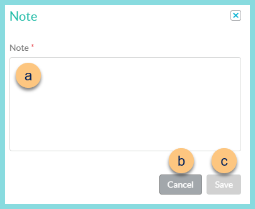
Notes - notice any existing notes. Click (+) Add New Note to add a permanent note.
-
Note - enter note text
-
Cancel - click to return to the previous screen without saving changes
-
Save - click to save changes
-
Reset - click to clear the production record day and return to the production record calendar screen
-
Populate Served from Point of Service - click to populate the served quantities from POS records for the same item, date, building, and serving session. Note: This is only available for items with the Sales attribute in addition to the Recipe or Simple Recipe attribute.
-
Close - click to close the production record day and return to the production record calendar screen. Note: Changes are saved automatically.
-
Post - click to post the production record and be redirected to the deducting inventory from production records screen