Orders
Purchasing > Orders
Orders can be created manually for a single vendor. Orders are created automatically for each vendor from an ordering guide. Users with approval rights can approve orders.
Orders Screen

-
Search - search by order identifier
-
Open and Requested - click to filter by order status (All Statuses, Open and Requested (default), Approved, Backordered, Closed, Open, Ordered, Received, Requested (awaiting approval), Shipping, Vendor Error)
Open Status - the order is currently in progress and has not been submitted
Requested Status (Requires Approval on All Orders or Requires Approval on Item only) - the order has been submitted and needs approval by someone with the Approve Orders right
Approved Status (Requires Approval on All Orders or Requires Approval on Item only) - the order has been requested AND approved by someone with the Approve Orders right
Ordered Status - the order was successfully submitted to the vendor via integration or email
Received Status - the corresponding item receipt has been posted
Closed Status - the order has been canceled after being submitted/approved (see Individual Order Screen, Step 25)
Backordered Status (Allow Back Orders enabled for vendor, only) - this order was generated by the system automatically when less of an item was received than ordered
Vendor Error Status - an order that was submitted and attempted to be sent to the vendor via integration or email failed to be delivered
Shipping Status - TBD -
Buildings - filter by the receiving warehouse
-
Reset - click to reset search parameters
-
Add New Order - click to add a new order
-
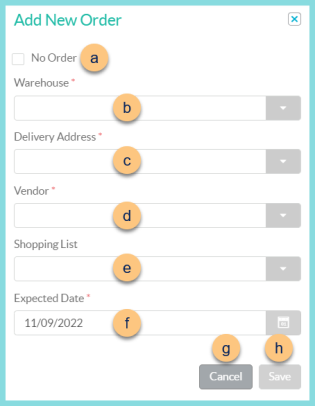
No Order (optional) - check to indicate that the selected warehouse does not need to place an order with the selected vendor for the selected expected date
Identifier (not pictured, only if configured) - enter a unique order identifier.
-
Warehouse - select the receiving warehouse
-
Delivery Address - select the delivery address
-
Vendor - select the vendor
-
Shopping List - select a shopping list to pre-populate the order with items on the list that are supplied by the selected vendor
-
Expected Date - select the expected date of delivery
Mark as Non-Inventory Order (not pictured, financial system integration only) - check to mark the order as non inventory and select the Coded to Non-Inventory Account -
Cancel - click to return to the previous screen without creating the order
-
Save - click to create the order and be redirected to the individual order screen
-
Advanced - click to open advanced filters
-
Expected Date - filter by expected date range
-
Approved Date - filter by approved date range
-
Vendor - filter by vendor; users with the Combine and Edit Bulk Orders right can now create bulk orders.
-
Items - filter for orders that contain the selected item(s)
Type (not pictured) - filter by order type (No Orders, Orders only, Orders including no orders, Only Non-Responsive Last Orders) -
Search - click to apply advanced filters
-
Identifier - click to sort by order identifier
-
Expected Date - click to sort by the expected date of delivery
-
Warehouse - click to sort by receiving warehouse
-
Vendor - click to sort by vendor
-
Status - click to sort by order status
-
Total - notice the total dollar value of the order
-
Pencil - click to be redirected to the individual order screen
-
Calendar icon - over the see order activity details
-
< > - click to scroll through pages
Individual Order Screen

-
Copy Order - click to create a copy of the order
Order Date (not pictured, Completed guides only) - notice the date the ordering guide was requested -
Status - notice the order status
-
Vendor Name - notice the vendor
-
Print Order - click to request the order report
-
Expected Date - change the expected date of delivery if needed
-
Identifier - enter or change the order identifier if needed. Note: This identifier is auto-created if enabled. The identifier cannot be modified if there is an active Financial System Integration.
-
Warehouse - notice the receiving warehouse
-
Delivery Address - update the delivery address if needed
-
Reference Number (optional) - enter a reference number for documentation purposes
Coded to Non-Inventory Account (not pictured, financial system integrations only) - change the selected non-inventory account if needed -
Identifier - click to sort by item identifier. Notice the vendor identifier.
-
Item - click to sort by item name. Notice the item description and the quantity of the base unit of measure per the preferred unit of measure.
-
Quantity - click to sort by the quantity, and update the quantity if needed.
-
Unit of Measure - click to sort by the unit of measure, and update if needed
-
Cost - click to sort by the individual item cost. Update the cost if needed as permissions allow.
-
Total - notice the calculated total (Total = Quantity x Cost)
-
Trash Can - click to remove the item from the order
(!) (not pictured) - hover to see a message that the item requires approval
Clipboard X icon (not pictured, discontinued items only) - hover to see that the item has been discontinued, click to replace with the selected replacement item if applicable -
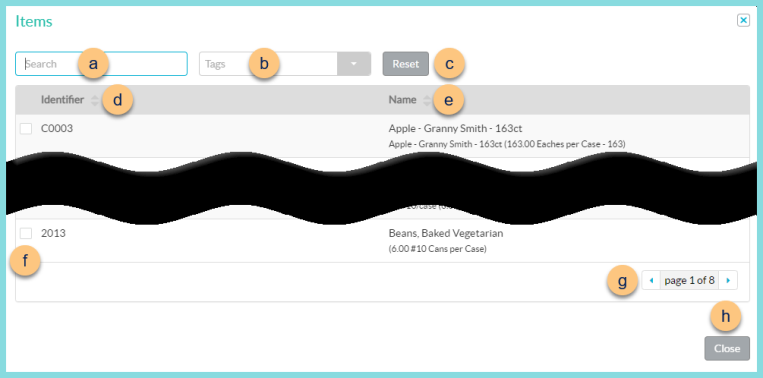
Search Items - search for items or click the Magnifying Glass to add purchased items from the selected vendor to the order.
-
Search - search for purchased items from the selected vendor
-
Tags - filter by item tags
-
Reset - click to reset filters
-
Identifier - click to sort by identifier
-
Name - click to sort by name. Notice the item description and the quantity of the base unit of measure per preferred unit of measure
-
Checkbox - check to add item to adjustment
-
< > - click to scroll through pages
-
Close - click to return to the previous screen with added items
-
Totals - notice the Order Subtotal, Total Discount, Total Handling Fee, Sales Tax, and Order Total
Note: Displayed totals are dependent on active modules. -
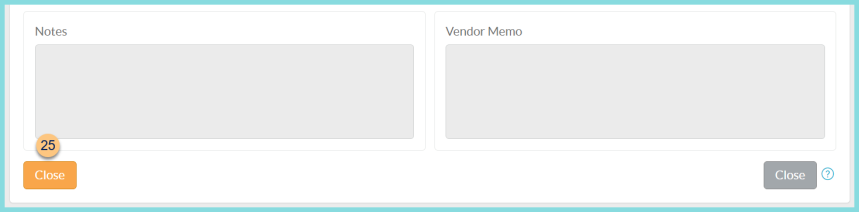
Notes - enter notes for documentation if needed
-
Vendor Memo - enter a note to appear on the vendor order if needed
-
Delete - click to delete the order
-
Close - click to close the order and return to the previous screen
-
Save - click to save the order and return to work on it later
-
Request Order - click to request the order.
Approve (not pictured) - click to approve the order. The order will not be submitted to the vendor until approved.Note: If a financial integration is configured, approving the order will also post the order to the ERP system general ledger. Errors will be displayed before the order can be submitted to the vendor: all items must have an Inventory Category configured, the Unit of Measure can be no longer than 6 characters for LINQ ERP FSI, and the order identifier must be numeric only.
-
Close - click to cancel an order that has already been submitted/approved