Photo Mode
pos.titank12.com
Upon initial entry into Photo mode, you will be asked to select filters. See Step 16 for details.

-
TITAN Logo - click to enter full screen mode
-
Notice the District Name and Cafeteria Name
-
Notice the Terminal Number, Date, Time, and Cashier Name
-
Cloud Icon - notice the status of the cloud icon
Green Check - connected to cloud
Gray Dash - not connected to cloud
Red Number - number of transactions saved in browser for communication when connection returns -
< - click to return to the previous screen
-
Notice the selected Serving Session.
Date (not pictured, changed date only) - notice the date if different than today -
Notice the selected Filter (Step 16).
-
Notice the person's photo, name, and ID or POS ID. Click to select that person.
-
Enter Next Id - enter the next identifier or POS ID keypad, keyboard, touchscreen, or barcode scanner to be redirected to serving screen if eat and repeat is not enabled
-
Clear - click to clear the Enter Next Id field
-
no id student - click to serve a No ID student (paid eligibility)
-
no id adult - click to serve a No ID non-student
-
< > - click to scroll through pages of photos
-
Notice the Previous Transaction information including the person's photo, name, ID or POS ID, Balance, Assigned or Enrolled Building, Grade (students only), and alert message if applicable. Click the Receipt icon to return to the serving screen to re-process or void the transaction.
-
Total Meals - click to view total meals served
-
Filter - click to change the photo filters
-
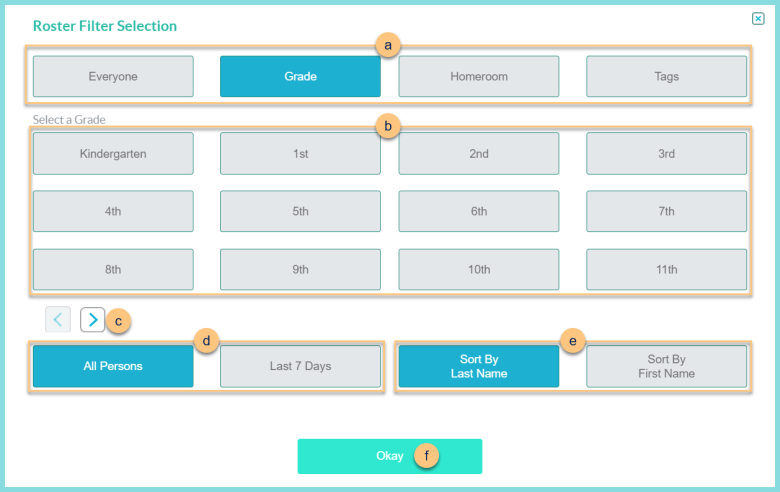
Choose filter type: Everyone, Grade, Homeroom, or Tags.
-
< > - click to scroll through pages of filter options
-
Choose between:
All Persons - view all persons within selected filter
Last 7 Days - view persons within selected filter who have had a transaction at this building in the last 7 days -
Choose sort order: Sort By Last Name or Sort By First Name
-
Okay - click to apply filters
-
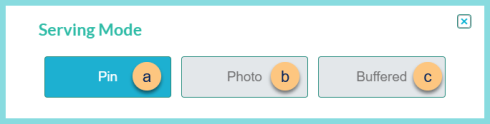
Mode - click to change the serving mode
-
Pin - click to select pin mode. Enter identifier or PIN via keypad, keyboard, or barcode scanner to serve
-
Photo - click to select photo mode. Click the person's photo to serve.
-
Buffered - click to select buffered mode. Enter identifier or PIN via left/right keypad or barcode scanner. Students will line up on either side of screen. Click person's photo to serve.
-
Search - click to be redirected to the search screen
-
Eat and Repeat - click to toggle Eat and Repeat status. Note: This is only visible if Eat and Repeat is enabled.
Green - Eat and Repeat is ON (person is served default item without being redirected to serving screen)
Orange - Eat and Repeat is PAUSED for next person
Red - Eat and Repeat is OFF