Reports
Standard Reports: Generate standard reports that are available in the LINQ Pay Portal.
Scheduled Reports: Schedule recurring reports to be emailed.
Report History: View previously generated reports.
Standard Reports
Recommended Reports for TITAN Reconciliation
The Transaction Details report shows the transaction ID and the order number. The order number is associated with the payment information in TITAN.

-
From the Reports screen, click Standard Reports.
-
Use the Select Report drop-down to select the Transaction Details report.

-
Choose how you would like to generate your report. Quick Reports are ready in a few minutes, but do not include today's data. If you would like to include today's data, select Include all up to date data.
-
Select a Report Date range from the drop-down list.
-
Choose to filter by merchant or include all merchants from the Filter By drop-down.
-
If you selected to filter by merchant, select the district you would like to run the report for from the Merchants drop-down.
-
Click Generate Report.
-
Once generated, click
 to download the .csv report or visit the Report History page.
The following fields are returned in the Transaction Details report:
| Field Name |
|---|
| TXN ID |
|
Transaction Type |
| Created |
| Captured |
| Status |
| Cardholder |
| Company |
| Description |
| Order Number |
| Card Brand |
| Card Type |
| BIN/ Routing |
| Last 4 |
| Origin |
| Imported |
|
Card Present |
| Amount |
| Approved |
| Net |
| Refunded |
| Merchant Cost |
| Merchant Cost Refund |
| Merchant Net |
| Auth Code |
The Disbursement Transaction Details report shows the Disbursement ID and the Transaction ID for transactions within a disbursement. This report can be matched to the Transaction Detail report by Order Number to see items in TITAN.

-
From the Reports screen, click Standard Reports.
-
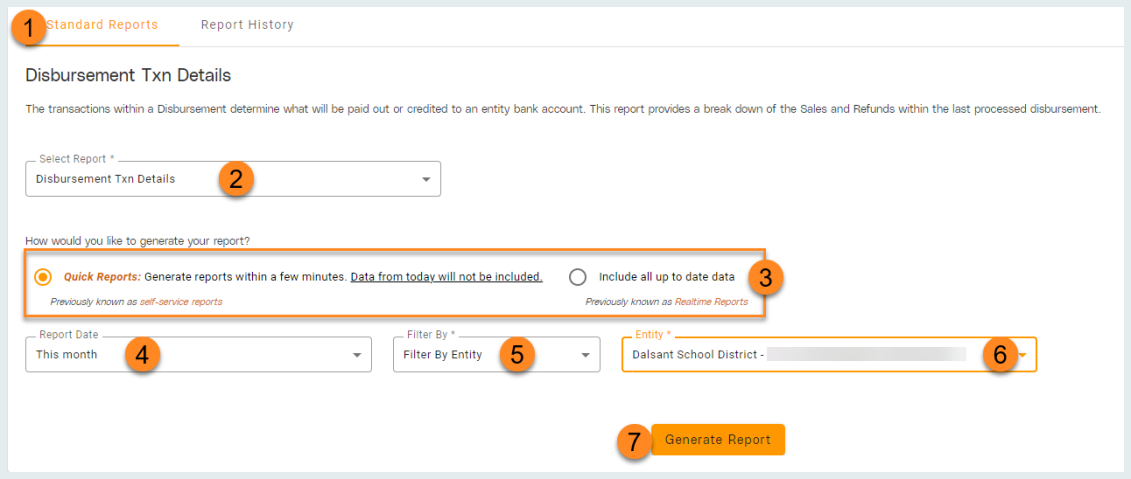
Select Disbursement TXN Details from the Select Report drop-down.
-
Choose how you would like to generate your report. Quick Reports are ready in a few minutes, but do not include today's data. If you would like to include today's data, select Include all up to date data.
-
Select a Report Date range from the drop-down list.
-
Choose to filter by entity or include all entities from the Filter By drop-down.
-
If you selected to filter by entity, select the district you would like to run the report for from the Entity drop-down.
-
Click Generate Report.
-
Once generated, click
 to download the .csv report or visit the Report History page.
The following fields are returned in the Disbursement Transaction Details report:
|
Field Name |
|---|
|
Disbursement |
| DBA |
| Cardholder |
| Card |
| Payment Method |
| Type |
| Created |
| Captured |
| Status |
| TXN ID |
| Approved |
| Amount |
| Fees |
| Net |
All Standard Reports
The following standard reports are available in the LINQ Pay Portal:
| Report Name |
Description |
|---|---|
| Transactions | Displays an overview of sales and refunds. Displays a chart that includes transaction dates, number of transactions, and dollar amounts for sales, refunds, and net. |
| Transaction Details | Displays additional transactional data such as cardholder information or transaction type. Data entities are configurable with Advanced Filters. |
| Payment Returns | Provides a list of eCheck/ ACH transactions that have been rejected by the issuing bank. |
| Account Updater | Checks for and provides a list of all updates to stored credit cards on merchant account(s). |
| Profit & Loss Statement | Exports data that pertaining to your district’s income and expenses for any given user, entity, income/ expense status, and date range. |
| Negative Balances | Provides a list of entities that have negative balances within your portfolio. |
| Invoices | Displays an overview of all pending, viewed, paid, and total invoices within the selected date range for the report, and how many of each calculate those totals. |
| Balance Details | Exports the balance details for any given date for any (or all) of your merchants on your account to see where your balance stands in terms of your income, expenses and net. |
| Dispute Details | Generates an indication of which disputes were initiated during the selected date range and the reason for the dispute. |
| Disbursement Summary | Disbursements are used to credit or debit the entity bank account to the primary account setup. This report provides details on disbursements that have been processed on your account. You will see an overview of the disbursement ID and processed date in addition to the total calculation of what composed the disbursement total. |
| Disbursement TXN Details |
The transactions within a disbursement determine what will be paid out or credited to an entity’s bank account. This report provides a break-down of the sales and refunds within the last processed disbursement. |
| Disputes | Generate all dispute-related actions (including opened, closed, won or lost disputes) during the selected date range. |
| Dispute Ratios | Provides the ratio of disputes to successful transactions a merchant receives. This ratio is compared against industry guidelines to help determine if a merchant’s dispute ratio is outside acceptable practices. |
Scheduled Reports
Admin > Reports > Scheduled Reports
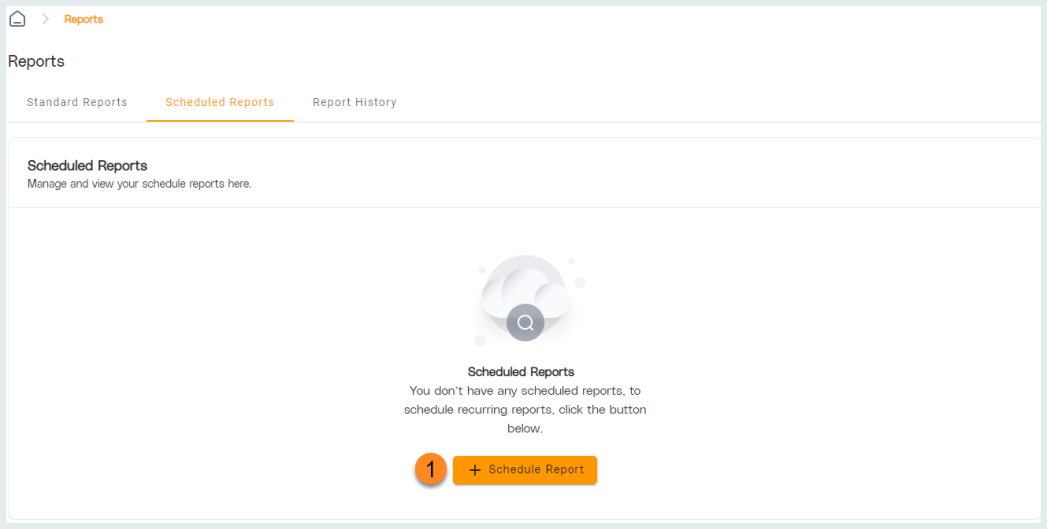
Create scheduled reports to run automatically on a recurrent basis. Reports that are less than 25MB will be emailed to you. Larger reports will be available in Report History.

-
Click + Schedule Report.

-
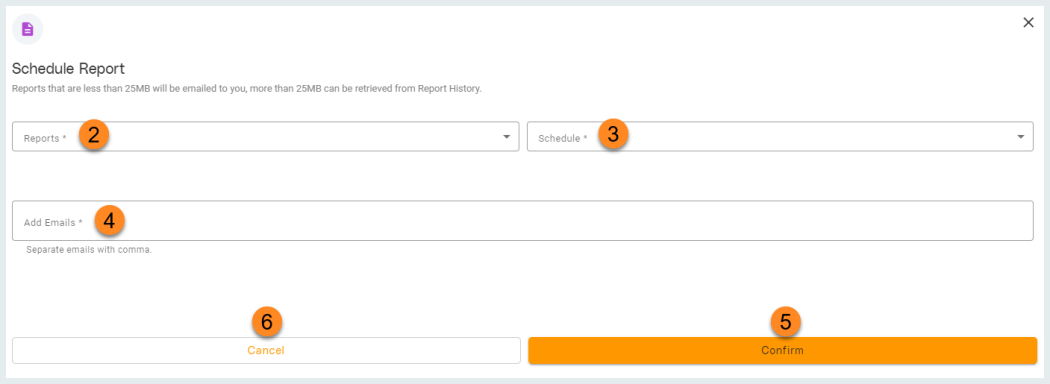
Select a Standard Reports to schedule from the Reports drop-down.
-
Choose the frequency with which to generate the report from the Schedule drop-down. When prompted, set the corresponding schedule including the Start Date and Time.
Options: Daily, Weekly, Monthly -
Enter the emails of users who should receive an emailed copy of the report in the Add Emails field. Multiple emails should be separated by a comma.
Note: Only generated reports less than 25MB will be emailed. -
Click Confirm to save selections.
-
Click Cancel to discard changes and return to the previous screen.

-
Notice the Report Type, Schedule, and Emails associated with created scheduled reports.
-
Click the Vertical Ellipsis to edit or delete a scheduled report.
-
Use the < > arrows to navigate between pages of scheduled reports if needed.
-
Click Report History to view previously generated reports or scheduled reports that are larger than 24MB.
-
Click + Schedule Report to add a new scheduled report.
Report History
Admin > Reports > Report History
View previously generated reports with Report History.

-
From the Reports screen, click Report History.
-
Notice the column headers including Report Name, Created date, report Type, completion Status, and Expiration date.
Note: Reports expire after 30 days. -
Click
.png) associated with a report to view additional options.
associated with a report to view additional options.-
Click Download to download the .csv file to your computer.
-
Click Delete to delete the report from the LINQ Pay Portal.
-
Click Copy Report ID to copy the unique identifier for the report to your clipboard.
-